system:inmation Recovery
This section describes the strategy for restoring system:inmation Core Configuration in production. Most of the process is identical for both a Central Core and a Local Core. However, for a Local Core where the Central Core is visible, the restore of the local configuration files (img files) will not be necessary as the Central Core will restore the Local Core when communication between the components is restored.
| When recovery is necessary for a Local Core that is disconnected from the Central Core, it is highly recommended that no further development be done on that Local Core until communication with the Central Core is restored, and operation returns to normal. |
Restore Strategy
There are two different kinds of scenarios that can involve recovery of the system:inmation Core Machine:
-
Installation Corruption - Failure of installed applications, Windows system or hardware/virtual machine
-
Configuration Corruption - Major misconfiguration or corruption of configuration files.
There are three different strategies to recovery the system depending on which backup contains the latest data and is available:
-
Full Virtual Machine restore from hypervisor snapshots: this is the recommended strategy if snapshots are available - follow the appropriate client IT procedures to facilitate this recovery type (reference Server Infrastructure Backup)
-
If snapshots are not available,
-
If System Corruption, rebuild the system using the IaC process and then proceed to 2b to restore the latest configuration.
-
If Configuration Corruption, but the system is still stable, execute the system:inmation Core configuration restore.
-

Restoring System from Image Files
The steps to restore the system from image files will depend on the exact situation and reasons for the restore. These are general guidelines for restoring the system and may require more or fewer steps depending on the situation.
-
Stop any inmation services (if any are running) in Task Manager or Services.
-
Locate the
inmation.rootdirectory on the hard drive. The folder name might have a different suffix with the instance name. -
Copy the image backup files, renaming as necessary, to the
imgfolder (include.inimg,.infpand.inlkgfiles).
-
Restart inmation services and verify that they remain running.
-
Connect to the Core with DataStudio, and check the communication status of Connector, Server, and Relay objects.
-
Check the log for information or errors,
If the services fail to restart (or fail to keep running after restart), there might be corruption of the image file so the “last known good” (lkg) image file can be used. However, the lkg image may be older than other backups available, so it would be prudent to check file dates on other backups versus the lkg file to determine the most appropriate file to use. To restore with the lkg file, follow these steps:
-
Stop any inmation services (if any are running) in Task Manager or Services.
-
Rename the image file (
.inimg) that is not working in theimgdirectory-
This retains the file in case it is still needed later.
-
Delete this file after it is determined that this file is no longer needed.
-
-
Locate the “last known good” image file (
.inlkg) and change the suffix to.inimg. For example, changecore.inlkgtocore.inimg. -
Restart the applicable services.
-
Connect to the Core with DataStudio and check the communication status of Connector, Server and Relay objects.
-
Delete the file that was renamed in Step 2.
| If you stop the inmation services and delete the existing image files, upon service restart, new image files will be created, but your system configuration will be lost. |
| Image files contain the system configuration but does not contain any historical data for the objects. All historical data is stored in the MongoDB repository. |
Restoring Persistency Database files
To restore the backup of the persistency database file:
-
Stop the inmation services (if any are running) in Task Manager or Services.
-
Locate the
inmation.rootdirectory on the hard drive.
-
Copy the backup of the database persistency file to the
dbfolder in the appropriate component folder of the work directory (e.g.inmation.root\work\core\db\for the Core). -
Rename the file to
dynprop.dbas necessary.
-
Restart inmation services.
Restoring from Full Virtual Machine Snapshot
To restore the system:inmation Core using a VM snapshot backup:
| # | Procedure | Expected Result |
|---|---|---|
1 |
Optional Step: Execute a backup of inmation Image Files, see system:inmation Backup Files. |
Successsful backup in system:inmation backup folder; this can be used for post-recovery root cause analysis. |
2 |
Optional Step: Execute a backup of local MongoDB, see MongoDB Backup Files. |
Successsful backup of MongoDB; this can be used for post-recovery root cause analysis. |
3 |
Request a hypervisor restore from the required snapshot following client IT procedures, see System Infrastructure |
System should successfully restart into Windows, with MongoDB and system:inmation Core services successfully running (as at the time of the snapshot). |
4 |
Review the Core and associated Connectors and Server Models via DataStudio. |
Objects successfully started and show green light icons. |
5 |
Check the log files for errors. |
Log files show no errors. (Log file operation implicitly confirms the local MongoDB operation.) |
6 |
Perform the Post-Restore Checks. |
Post-Restore checks are passed. |
Restore Virtual Machine from IaC
This process will involve rebuilding the virtual machine and using file backup to restore the configuration of the core machine.
| # | Procedure | Expected Result |
|---|---|---|
1 |
Optional Step: Execute a backup of system:inmation image files, see system:inmation Backup Files. |
Successsful backup in system:inmation backup folder; this can be used for post-recovery root cause analysis. |
2 |
Optional Step: Execute a backup of local MongoDB See MongoDB Backup Files. |
Successsful backup of MongoDB; this can be used for post-recovery root cause analysis. |
3 |
Initialize virtual machine with identical specifications as original server. |
System is successfully restored into Windows. |
4 |
Configure and install virtual machine following IaC process. For a local core, the |
IaC process is successfully completed. |
5 |
Perform the Post-Restore Checks. |
Post-Restore checks passed. Configuration is successfully recovered. |
Restore system:inmation Core Configuration
To restore the system:inmation Core configuration, using a file level backup, following these steps:
Central Core & Local Core Recovery
This process recovers the central Core server or a local Core server.
| A local core that can communicate with the central Core can skip Step 7, as the latest configuration will be restored by the central Core. |
| The same process can be used to restore a system:inmation component service (e.g. Connector or Interface Server). Skip Step 7, since the component service would be rebuilt automatically by the connected Core. |
| # | Procedure | Expected Result | ||
|---|---|---|---|---|
1 |
Optional Step: If not already completed, execute a backup of system:inmation image files. See system:inmation Backup Files. |
Successsful backup in system:inmation backup folder; this can be used for post-recovery root cause analysis. |
||
2 |
Optional Step: If not already completed, execute a backup of local MongoDB See MongoDB Backup Files. |
Successsful backup of MongoDB; this can be used for post-recovery root cause analysis. |
||
3 |
Mount D: drive backup or recover backup configuration from system:inmation backup folder.
(eg |
Backup files and folders are available to virtual machine for recovery. |
||
4 |
Confirm that backup contains Core img Files, persistancy DB files and local MongoDB files. |
Backup contains required backup files. |
||
5 |
Stop running inmation and MongoDB services. |
Services have been successfully stopped. |
||
6 |
Move or rename current Image files ( |
Files have been successfully moved or renamed. |
||
7 |
Copy the backup from Step 3 of the Image files to the img folder.
|
Files have been successfully copied into folder. |
||
8 |
Move or rename current persistency database file, dynprop.db For the Core, found in |
File has been successfully moved or renamed. |
||
9 |
Copy the backup of the database persistency file to the |
Files have been successfully copied into folder. |
||
10 |
Rename local MongoDB |
Folder has been successfully renamed. |
||
11 |
Copy the backup of the local MongoDB files to the |
Backup folder has been successfully copied. |
||
12 |
Start Inmation and Local MongoDB services. |
Services have been successfully started. |
||
13 |
Perform Post-Restore Checks. |
Checks are completed successfully. |
||
14 |
Remove transient backups in Steps 6, 8, and 10. |
Files and folders have been successfully deleted. |
Post-Restore Checks
| # | Procedure | Expected Result |
|---|---|---|
1 |
Check inmation Core and MongoDB services are running. |
Both inmation Core and MongoDB services are running. 

|
2 |
Connect and log in to restored Core with DataStudio. |
DataStudio should successfully connect to Core server. |
3 |
With DataStudio, connect to a Core and check to make sure Core and associated components are showing OK. |
Look for the following:
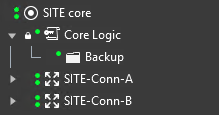
|
4 |
For associated MongoDB and MongoDB replica sets, perform their Post-Restore Checks. |
Post restore checks completed successfully. |